You know that feeling when you’re lying on your back in the grass, staring up at a sky freckled with twinkling stars, and your kiddo tugs at your sleeve and asks, “What’s that big, shiny star over there?” And you go, “Uh… I think it’s… umm… Venus? Or maybe an airplane?” It’s okay, we’ve all been there. But hey, wouldn’t it be cool if next time, you could answer with confidence, “That, my dear, is Jupiter, the largest planet in our solar system.” And wouldn’t it be even cooler if you could do this without some fancy, bank-breaking telescope? So how do you break into backyard astronomy then?
Hobby astronomy begins by observing the night sky using the naked eye or homemade visual aids. Learn basic constellations, observe the lunar cycles, and keep track of meteor showers. This hobby offers an infinite source of wonder, is highly educational and exciting, especially when shared with kids.
Trust us, we’re just like you. A bunch of curious folks, always ready to dive into something fun and fascinating. And we’re telling you, astronomy is that perfect mix of adventure and learning, not just for you, but for your little ones too. It’s not about hefty textbooks or complicated jargon. It’s about those “wow” moments when you spot the Orion’s Belt for the first time or when you finally understand why the moon changes shape. It’s about the laughs when you misidentify a blinking satellite as a UFO. And above all, it’s about the shared experience as a family, under the starlit sky, making out of this world memories.
As warmer weather approaches, we’re resurfacing one of our favorite how-tos – astronomy. Reaching back into our 2016 vault, we’ll show you how to take the first step into the vast cosmos. And guess what? You won’t need to leave your backyard, and you certainly won’t need to spend a fortune on equipment.
In this article, we’ll give you the lowdown on the basics of astronomy, hand you a simple guide to DIY stargazing, show you how to build a telescope on the cheap and how to use a star chart. Plus a few additional treats along the way. So, what do you say? Ready to explore?

THE BASICS OF ASTRONOMY
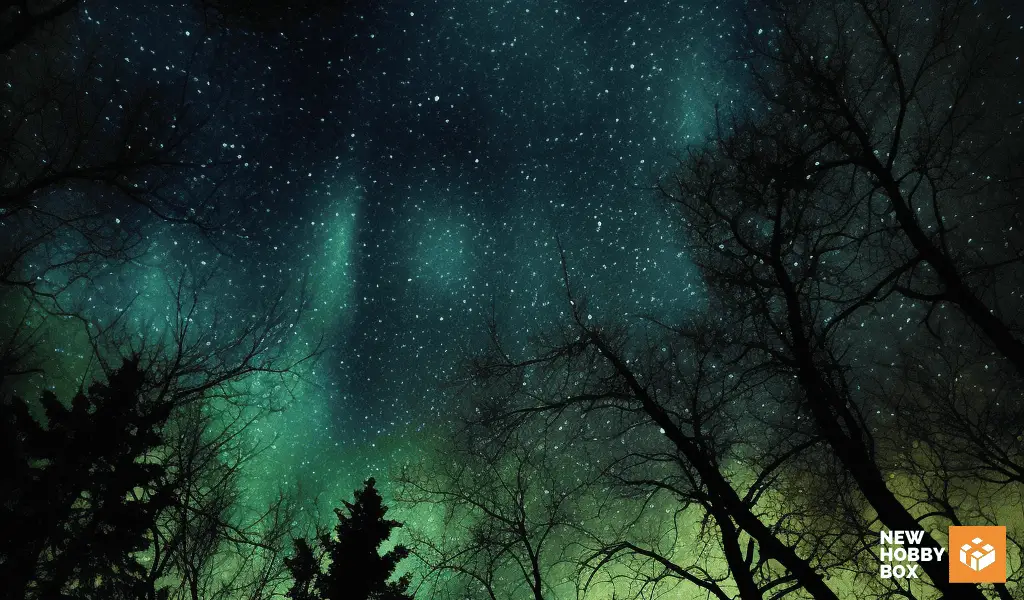
Imagine, if you will, a balmy night under a sky painted with a myriad of twinkling lights. That is the awe-inspiring canvas of astronomy, the scientific study of celestial objects, space, and the physical universe as a whole. Unraveling the secrets of the stars, galaxies, and planets, it’s an ancient discipline that continues to capture our imagination even today. O
One of the earliest hobbies to pique human curiosity, it has us gazing upwards, striving to comprehend the infinite cosmos. Remember Galileo? He took his turn at the telescope back in 1609, and the design you’re going to make in this tutorial is modeled off of his original telescope. In this sense, you’re not just engaging in a new hobby, but stepping into the shoes of one of history’s greatest minds.
Why Is Astronomy An Interesting Hobby?
So, why astronomy? Here’s the thing: This is a hobby that scales to fit you. For those seeking calm, it’s an escape from the hustle and bustle, an opportunity to relax under the starry night sky. But it can also be an engaging learning experience, a way to stir up your intellectual curiosity. It brings science, history, and nature together in a captivating mix that’s hard to resist.
And hey, who knows? Today you’re a backyard observer, but tomorrow you could be the one to spot that next comet or identify an uncharted star. Plus, it’s an activity that spans all ages – what better way to bring families together than under a canopy of stars? Now, you might be wondering, what can I see without any fancy gadgets? A lot more than you’d think!

What Can One See Without Any Equipment?
Unaided human eyes can spot up to 2,000 stars on a clear, moonless night. You can watch the drama of a meteor shower, trace the arc of a satellite, and even glimpse the distant twinkle of a planet. Let’s not forget our Milky Way galaxy, a celestial spectacle that’s visible from just about anywhere on a dark night.
Throw in a homemade telescope using a cheap lens and a paper towel tube, and your telescope can take the exploration to whole new levels. All without having to spend thousands of dollars on telescopes.
But the joy of astronomy is not about the equipment you have, but the wonders you can behold – the goal here isn’t to become the next Neil deGrasse Tyson overnight. Rather, it’s about taking a moment to pause and marvel at the grandeur of the universe that surrounds us. It’s about inspiring a sense of curiosity and wonder in your own backyard. So, why not give it a shot? With this New Hobby Box astronomy tutorial, you’re not just picking up a pastime. You’re opening up a gateway to the cosmos.
Again, you won’t need expensive gear to get started here – save your money for a legit telescope after you fall in love with the hobby, but there are a few affordable and accessible items you’ll want to grab so you can follow along with the full DIY.
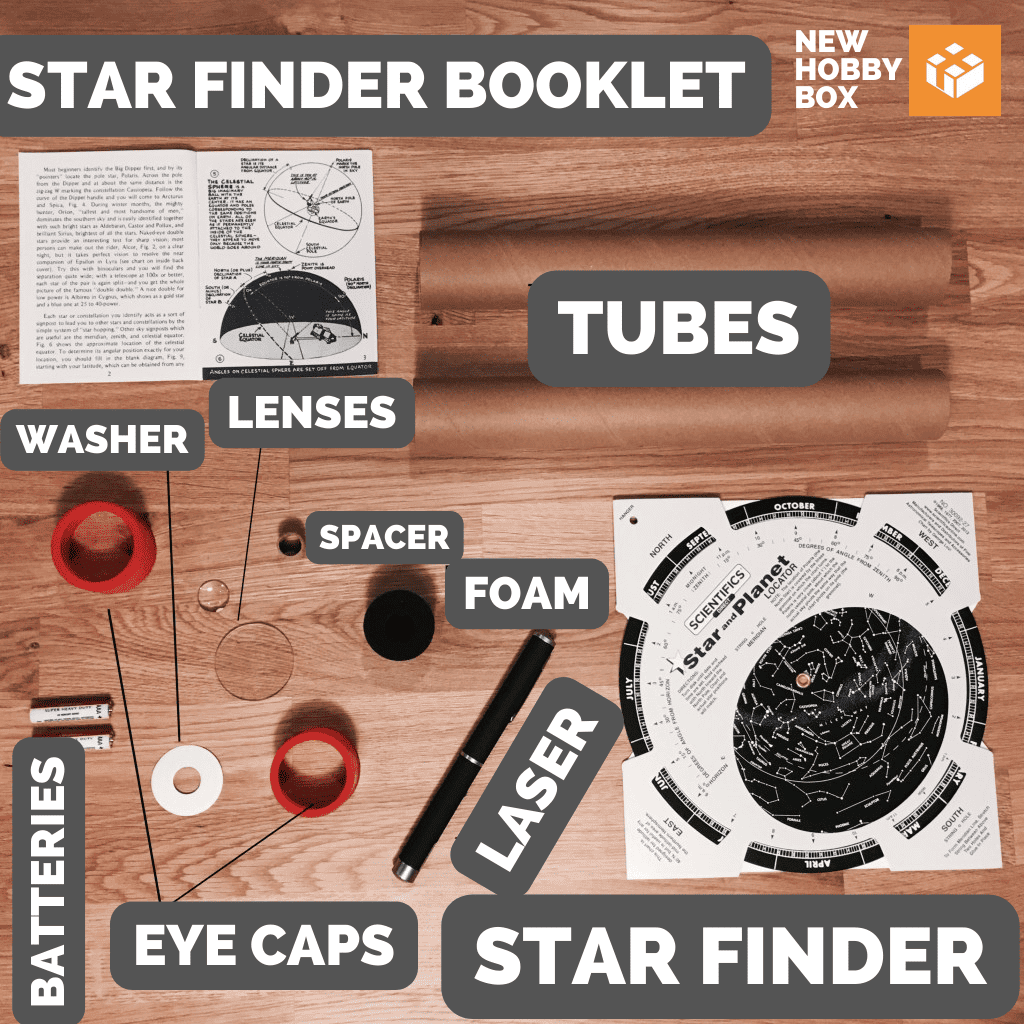
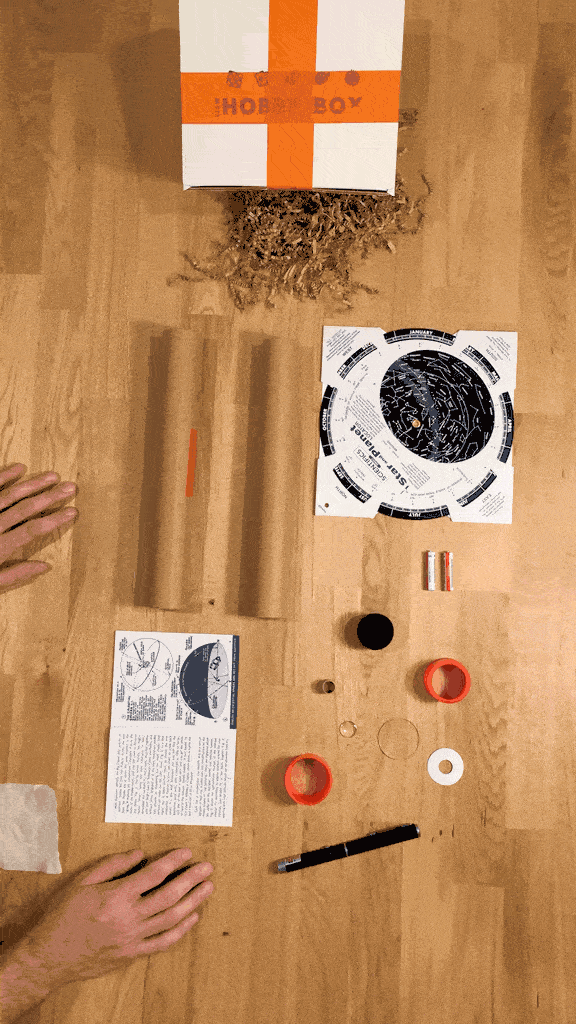
SUPPLIES NEEDED FOR BACKYARD ASTRONOMY TUTORIAL
We’re big fans of making recommendations based on items that check the box in value – to us, this means they aren’t expensive, are high quality, and they don’t consume a ton of time to setup. You’ll need a few things to follow along with this tutorial.
- Simple Refracting Telescope: This tutorial uses a couple of basic lenses and paper tubes to create a telescope. The activity of making the telescope is a great entry way into astronomy. You can purchase a single telescope kit for rather cheap, but if you intend to purchase 5 or more, you’ll want to get the 8-pack bundle telescope kits – it will save you some money.
- Star and Planet Locator: This is a timeless star chart and planet locator. Seriously, this same model has been around forever. You can probably find a used one for rather cheap on Ebay, but if you want a fresh print, you can still get it affordably off Amazon. This little device is powerfully cool, and will open your family’s eyes as to how magical the universe can be. It comes with an informative booklet to walk you through usage of the tool. We highly recommend the Star and Planet Locator before you decide to download an app – it’s a bit like learning how to do arithmetic before you use a calculator.
- Laser Pointer: This isn’t absolutely necessary, but it’s a fun way to make sure everyone is tracking what you’re seeing. You can use just about any laser pointer you have lying around, but if you don’t have one, just grab a cheap laser pointer from Amazon. Tell the kids to be careful and no pointing in eyes or at planes overhead.
And that’s all you need to get started. Once you have the kits and supplies in hand, it’s time to set the scene with a bit of important, but quick information.
THINGS TO NOTE BEFORE YOU START READING THE SKIES
It might seem like you’re about to dive into a deep, dark cosmic pool, but don’t sweat it – we’re here to float you through. First things first: constellations. You know, those star clusters that look like dot-to-dots in the sky? Orion, the Big Dipper – you’ve probably heard of them.
They’re like our guides through the galaxy, the first words in the language of the stars, helping us navigate the cosmos as our ancestors did, and as the saying goes, “The sky is full of stories.” So how do you start speaking the language of stars? Enter: star charts
You’ll Need Your Star Chart
Ever wondered how ancient civilizations knew when to plant crops or celebrate seasonal festivals? They used star charts – and you can too! Think of a star chart as your personal roadmap to the night sky. It helps you identify constellations, stars, and celestial events – a true companion on your astronomy journey.
And there’s something magical about unfolding your star chart under the soft glow of a red flashlight, the stars twinkling above, as if whispering secrets of the universe. But more on all of this later on.
Stargazing Events: Timing and Location Matter
Here’s where the fun really starts: celestial events. Meteors zipping through the sky like sparklers. Comets blazing trails across the heavens. And you’re there, front-row seat, in the comfort of your own backyard. Not bad for a hobby, right? And all this without a single piece of fancy equipment. Even if you forgo building a telescope, the best part about stargazing is it’s as easy as laying back and looking up. But this does require certain conditions.
Clear, moonless nights are your golden ticket, especially if you’re away from the city lights. Even your own backyard can become a pop-up planetarium. And that’s the beauty of it. This isn’t just about gazing at distant lights in the sky. It’s about sparking curiosity, creating a shared experience, and bringing us closer together, under the same stars that have watched over us for millennia.
By the end of your stargazing session, you’re bound to feel a new connection with the skies above. And who knows? You might just find that astronomy isn’t just a new hobby – it’s a new love.
HOW TO PRACTICE ASTRONOMY ON THE CHEAP
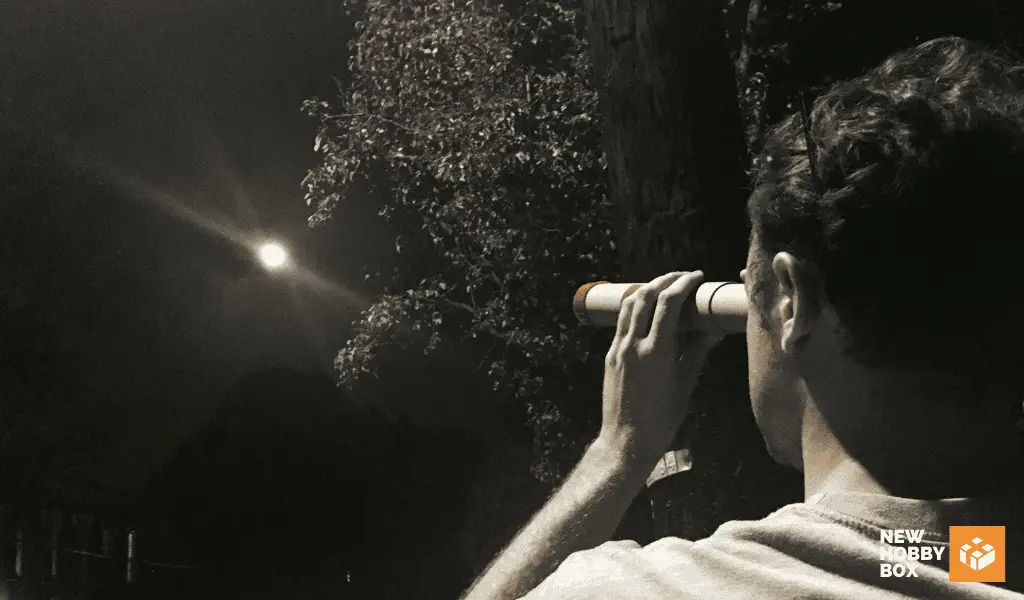
It’s time to begin the tutorial. First off, let’s chat about how to build a telescope at home. Yeah, you heard right – you’re gonna be crafting your very own stargazing tool, and it’s simpler than you think. Once we finish it, we’ll follow up by putting it to good use – staring at the night sky.
In the second part of this tutorial, we’ll work through the star finder and your booklet, using your telescope to take a closer look, and your laser pointer to help show others what you’re looking at. So grab your kit and supplies, add a pinch of curiosity, a sprinkling of wonder, and let’s begin.
How to Build a Homemade Telescope
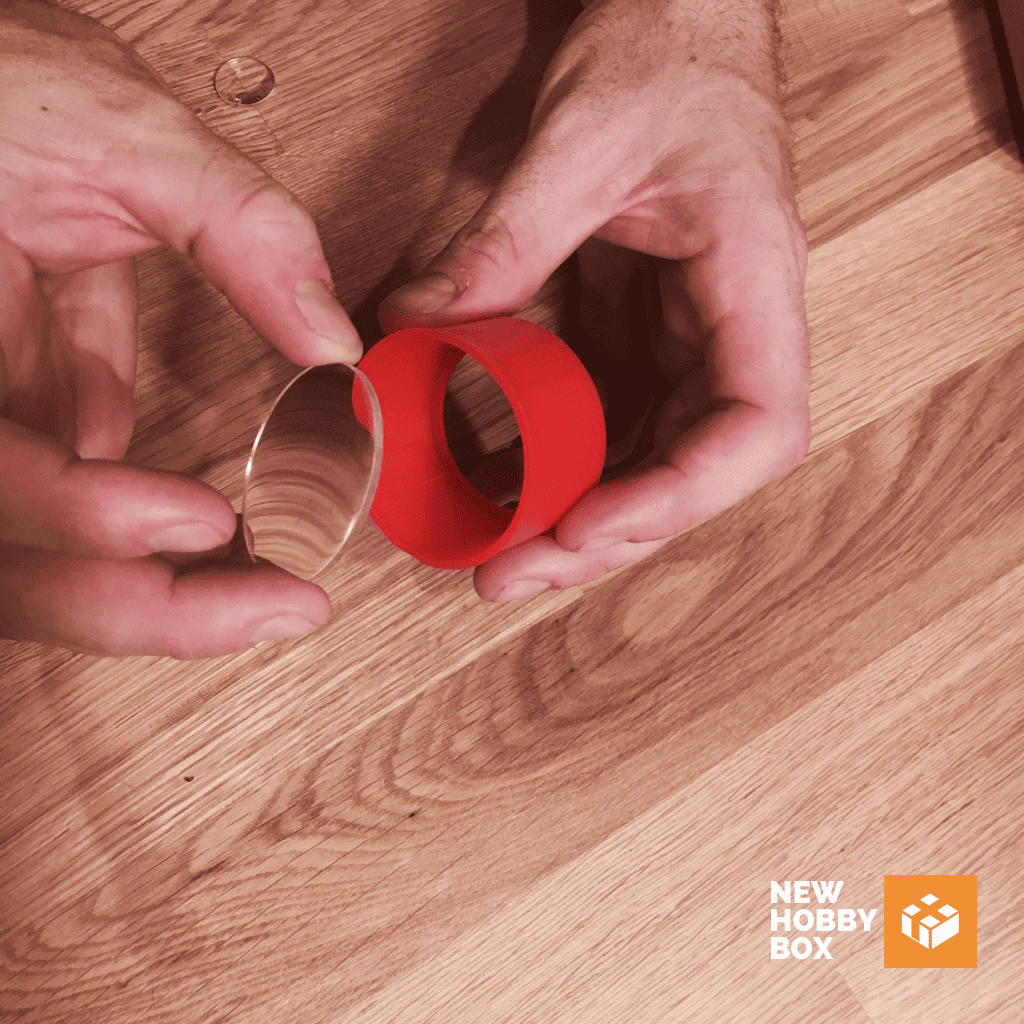
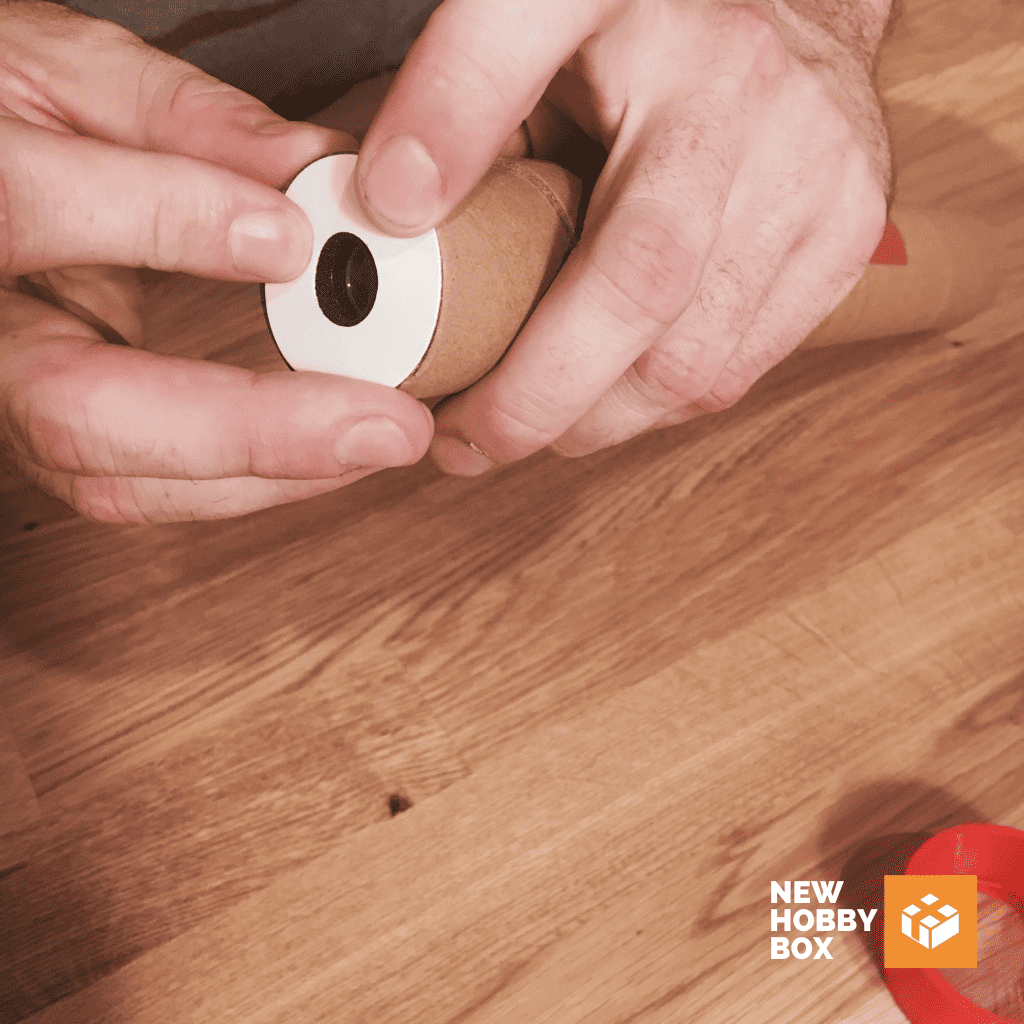
1. INSERT LENS INTO RED CAP
Lay the red cap down on a table with the wide-open end facing up. Carefully pinch the edges of the objective (large lens) in your dominant hand, and place it with the curved side of the lens facing down inside the red cap.
If you’re uncertain which side is curved, grab the lens by the edges and place it on a smooth flat surface. Gently blow air on it. If the lens rocks, the curved side is touching the table and faced down. If it doesn’t budge or rock as you blow air at it, then the curved side is facing you.
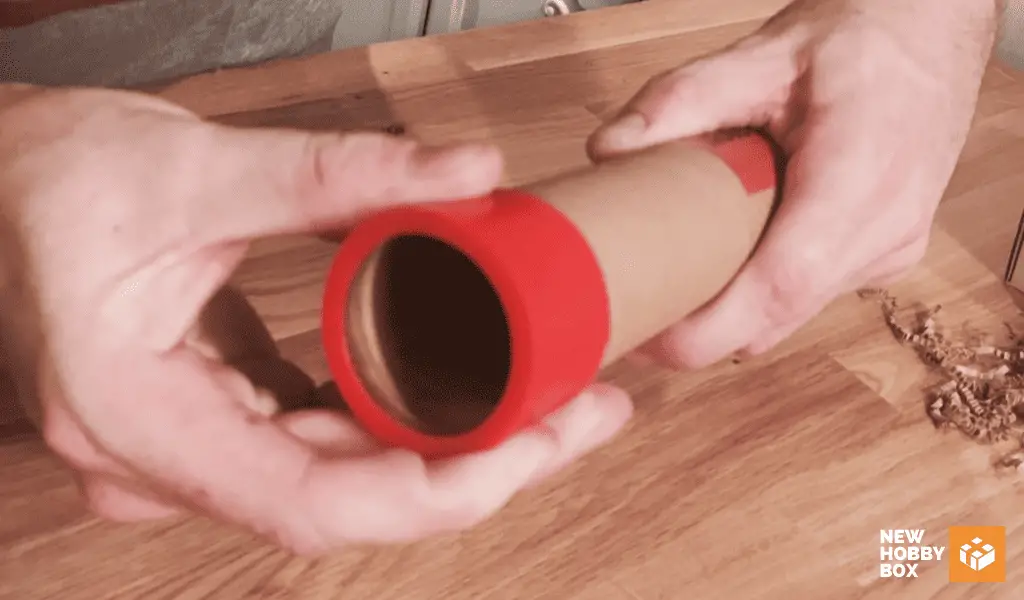
2. CONNECT TUBE TO CAP
Grab the larger end of the two sliding tubes and insert it into the other cap that currently does not have the lens inside it.
3. PLACE CARDBOARD SPACER IN FOAM
The foam piece is meant to hold your lens in place while it’s inside the tube. Lay it flat on the table and grab your cardboard spacer. Gently push the cardboard spacer into the foam lens holder so that it slides all the way to the bottom of the foam lens holder, where it comes into contact with the table.
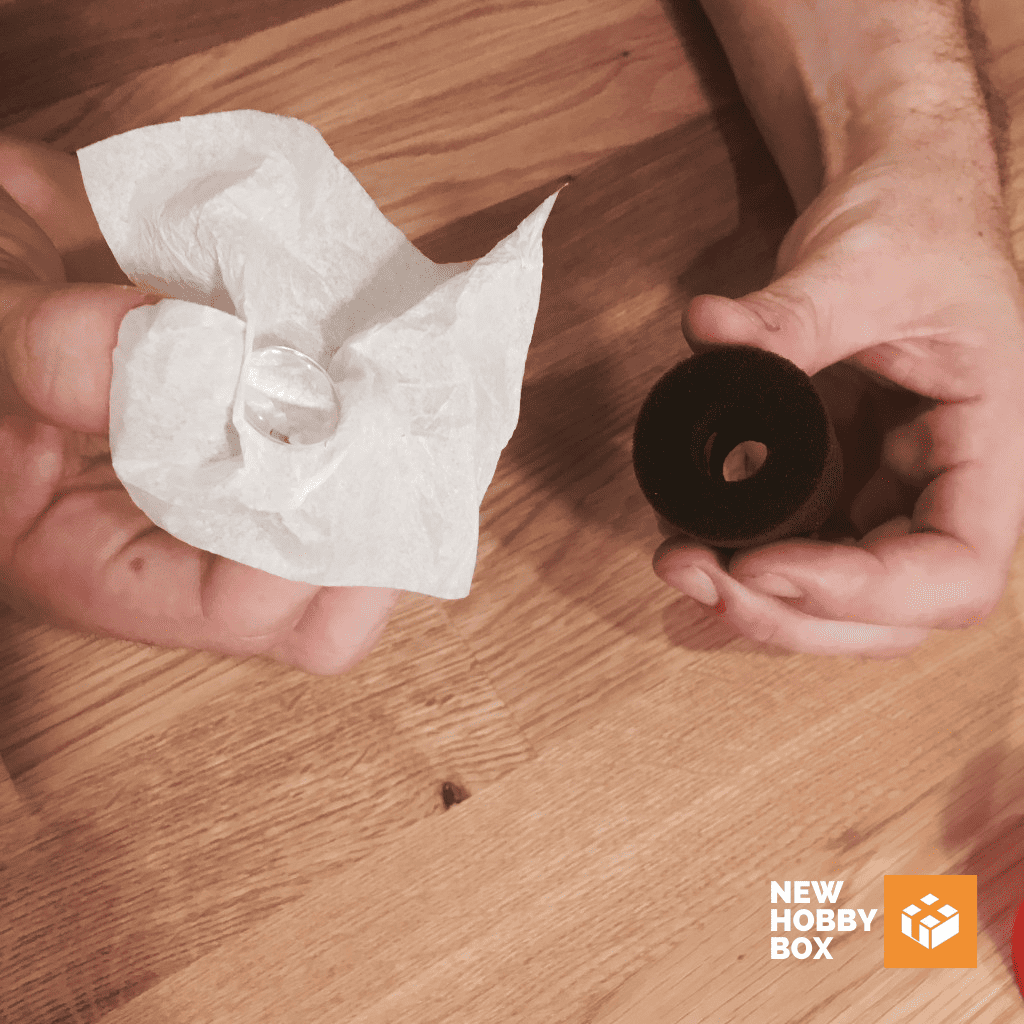
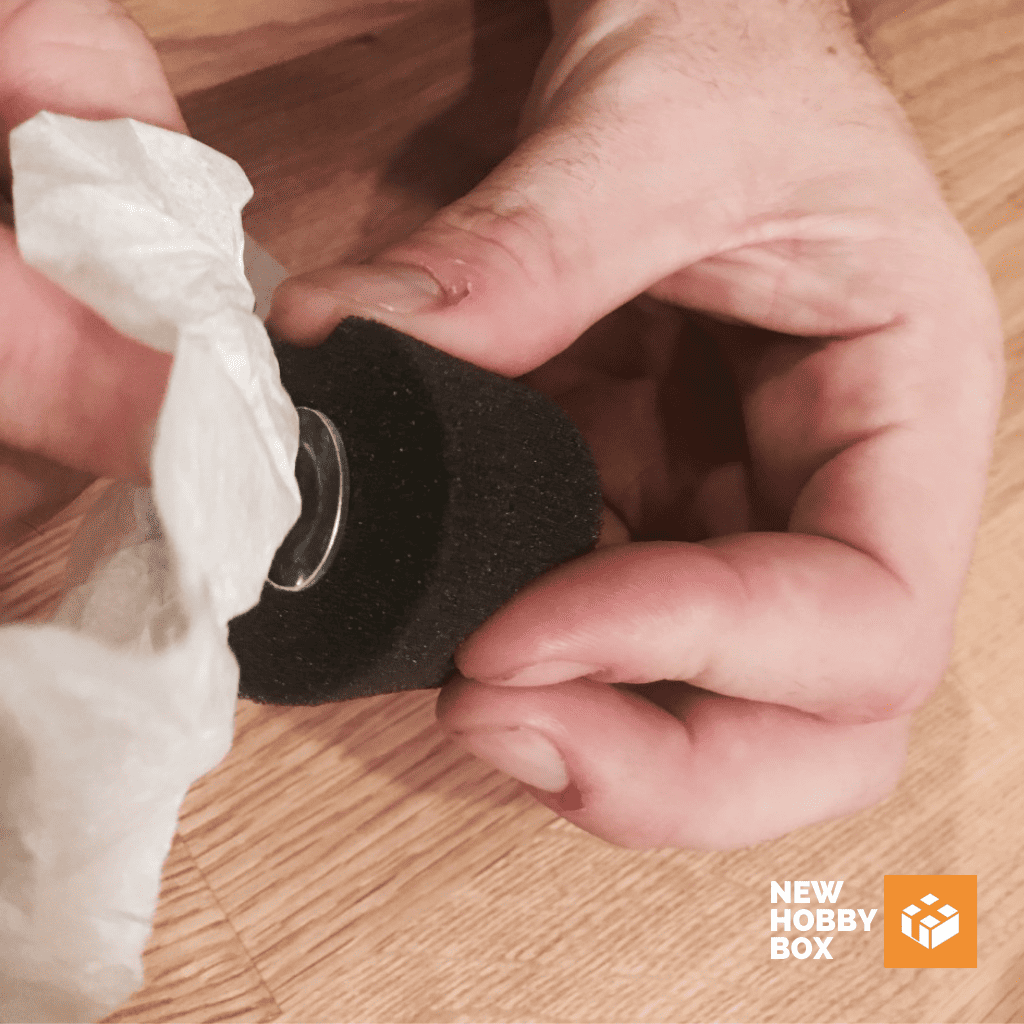
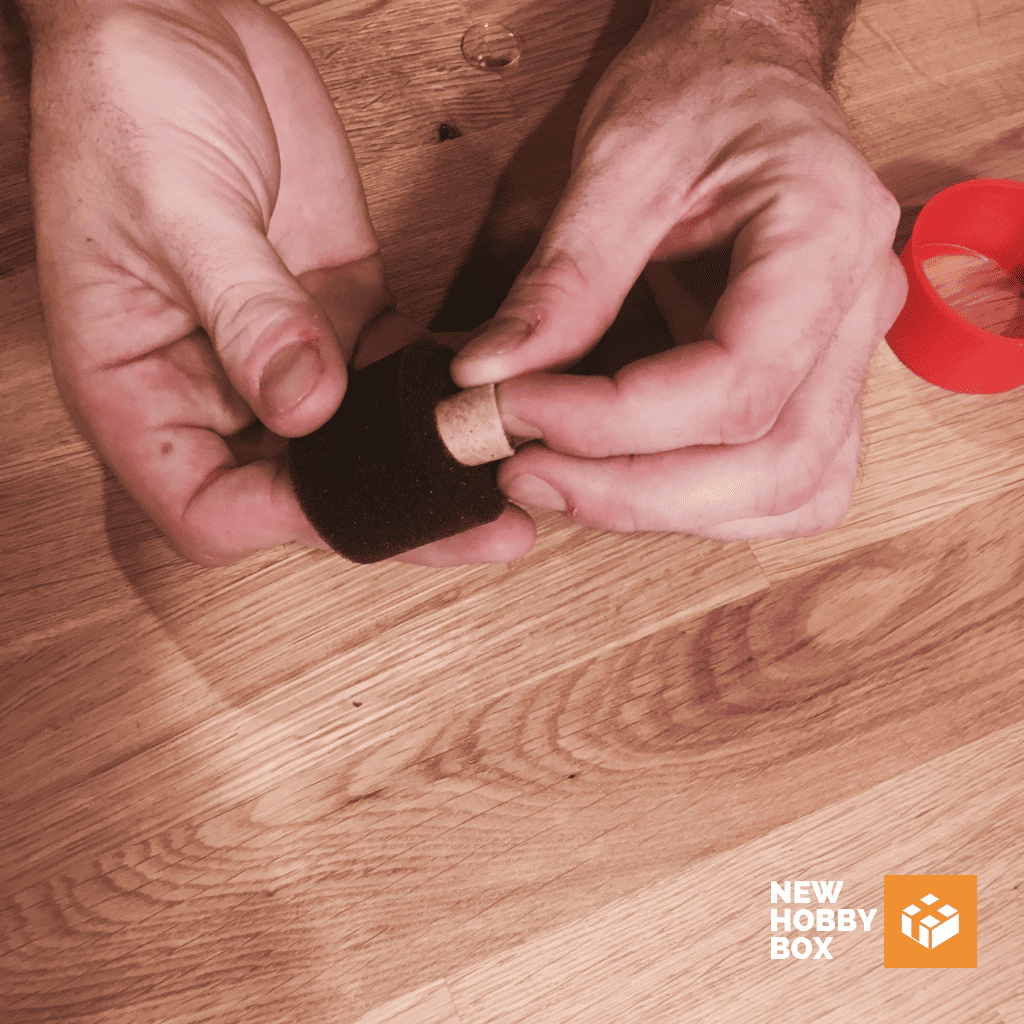
4. HOLD SMALLER LENS IN PLACE
Grab a tissue or smooth rag and pinch the smaller lens by its edges. Lift it and place inside the foam roll, pushing it toward the cardboard spacer. Be sure to not touch the lens with your fingers to prevent smudges or scratches.
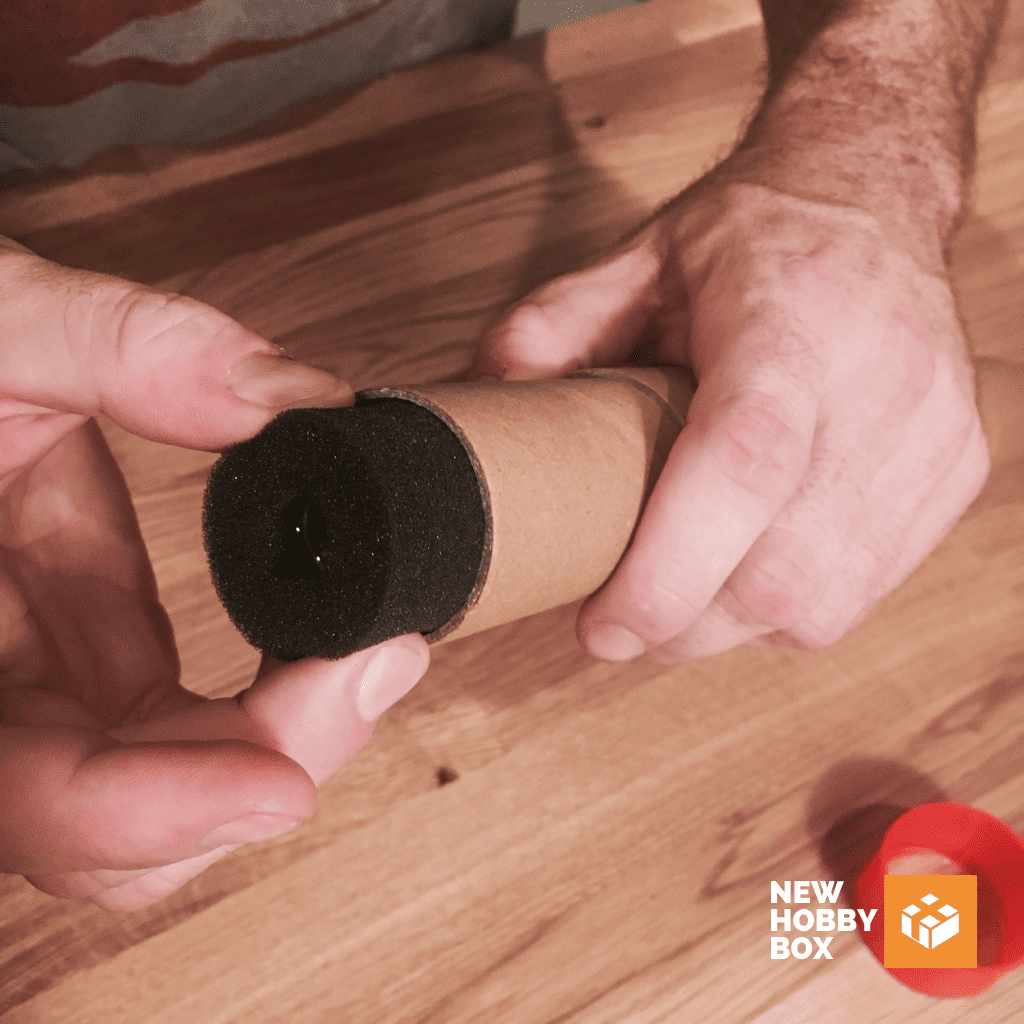
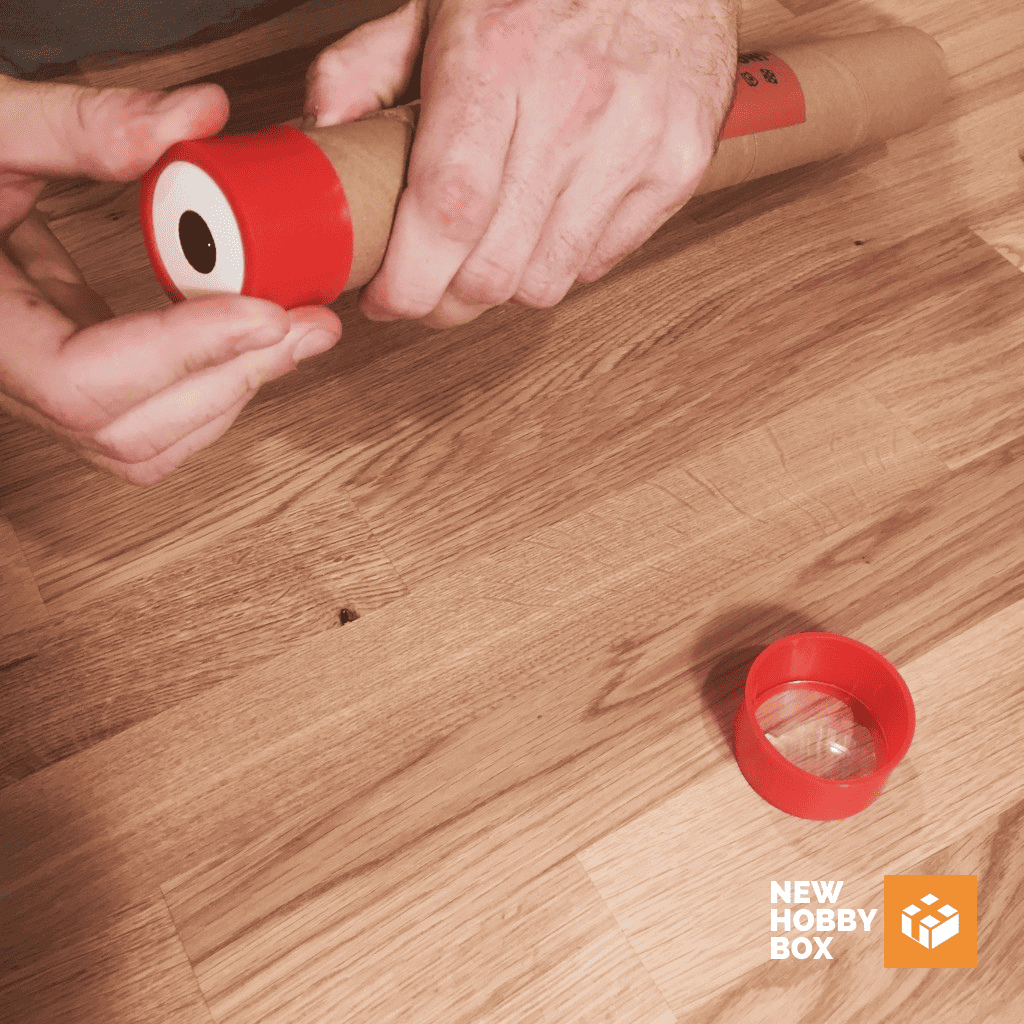
5. CONNECT THE TUBES
Using the smaller end of the two sliding kraft cardboard tubes, simply slide the open end over the foam eyepiece holder. Grab the cardboard washer and place it over the end of the smaller tubes opening, then place the second red cap and secure it around the end of the tube. This will keep everything in its place.
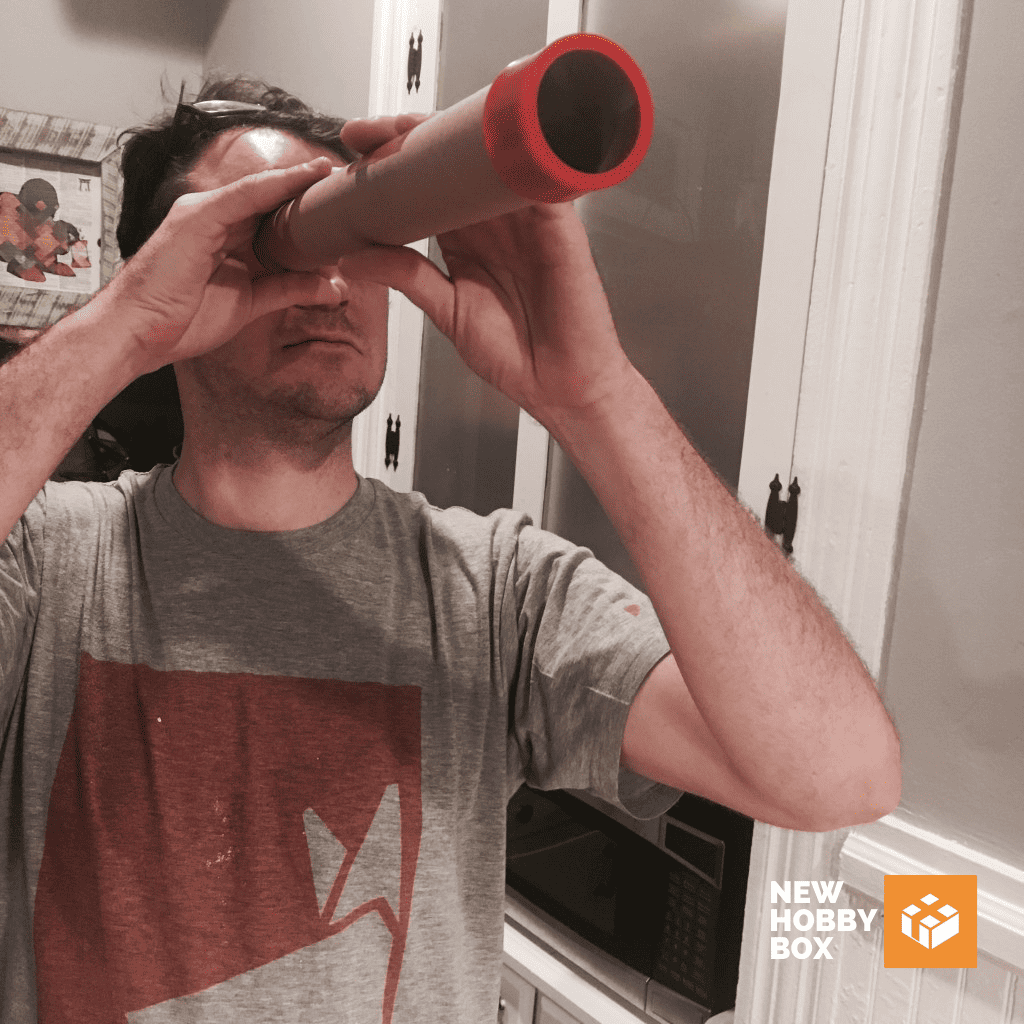
5. ACT LIKE A PIRATE
Congrats, your handmade and homemade telescope is ready! Let’s look at how to navigate the stars.
How to Find Stars
Now you’ve built your homemade telescope, it’s time to put it to work. But how do you do that, you ask? It’s all about getting your hands on the right maps. We’re talking about star charts and a special booklet to help you decipher them, you’ll need your laser pointer for this part as well, so you can show others what you’re looking at in the sky. So, grab your telescope, your star chart, your pointer, and your sense of wonder, and step outside. The universe is waiting to say hello!
START WITH WHAT YOU KNOW – PAGE 2
When we first took up this hobby, we set out to find planets and galaxies far away… our ambitions were in the right place, but our technology and general experience were way too deficient. You may be convinced to try and find a star or object you’ve never heard of before. But if you can resist the urge, we highly recommend starting your adventure into the heavens with something you know. It will help you get your bearings, which is what astronomy depends on at its foundations. In hindsight, this would have saved us a bit of frustration right out of the gates.
We would recommend looking for something like the Big Dipper or the North Star – objects that you most likely know how to locate in the sky, without the help of anything else.
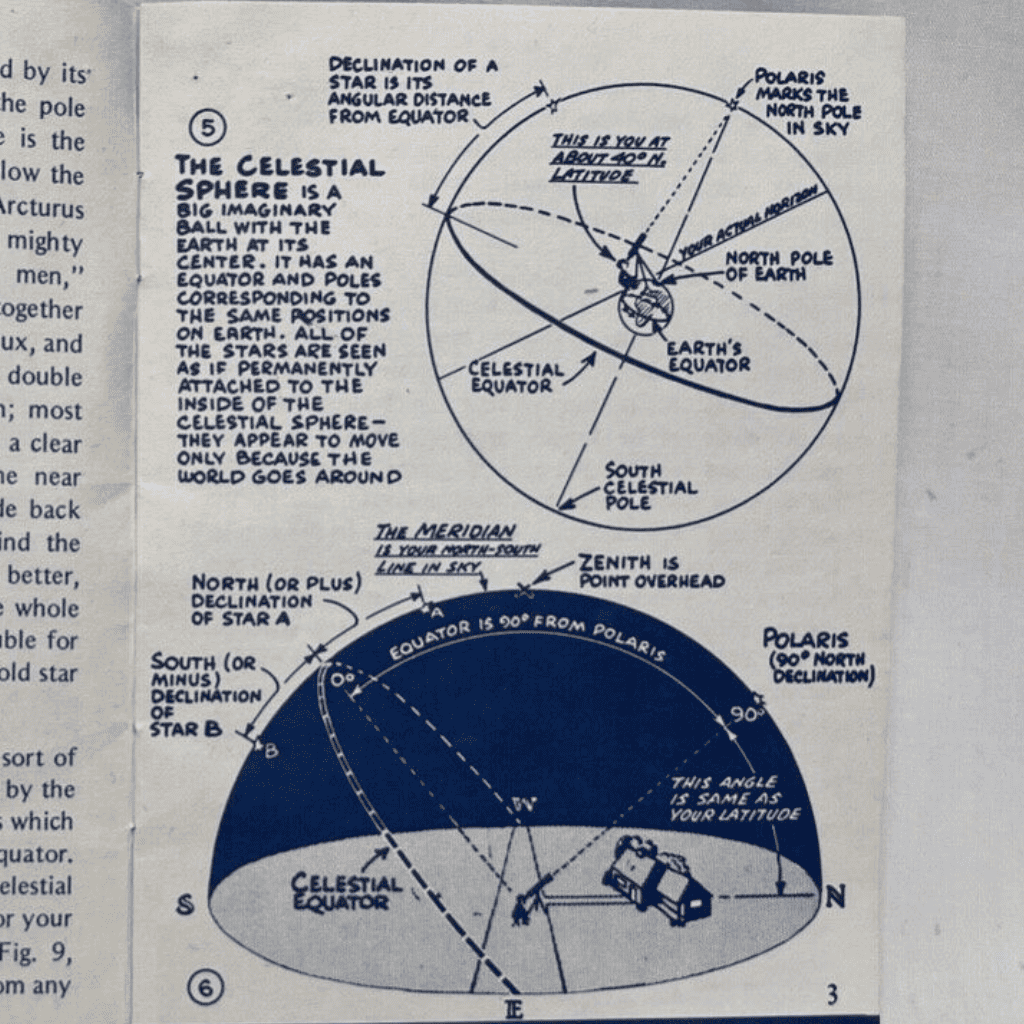
FIND YOUR ZENITH – PAGE 3
Examine Figure 6 on page 3 of your booklet. This visual is extremely helpful for understanding the celestial equator. This visual hit home when we were trying to better understand the celestial equator. It’s a bit like being in the dead center of a snow globe. The top of the snow globe (directly above where you would be sitting in the center) is your zenith (or the latitude of your position). The zenith represents the stars and planets that will be directly above you.

Need to find your latitude? Google is great for the smaller cities, but page 9 has a pretty comprehensive list of US cities as well. This latitude or zenith essentially becomes your angle from the horizon.
FIND YOUR MERIDIAN – PAGE 4-5
This gets back to basic geometry, but to find your meridian, you’ll simply subtract your zenith from 90°. The meridian is accounting for your southern horizon. So if your zenith is 40° then your meridian is 50°. We get it… you’ve spent years of counseling trying to forget geometry… But if you need help, check out page 5 as it lays the meridian out nicely. The top visual shows your 0° will always be the celestial equator and your 90° will be the pole.
On the far right side going up and down the edge of the figure, you’ll find the meridian scale – take note of what your meridian is and make a tiny mark for reference on where you are. Remember, you’ll see all the way down to the south horizon from the zenith.

PIECE IT ALL TOGETHER – PAGE 6
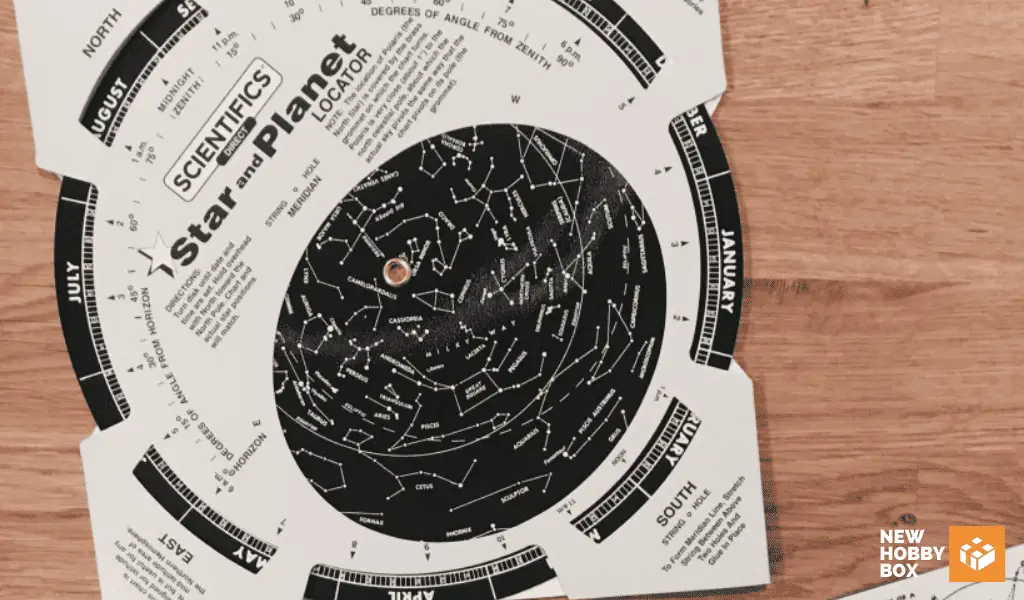
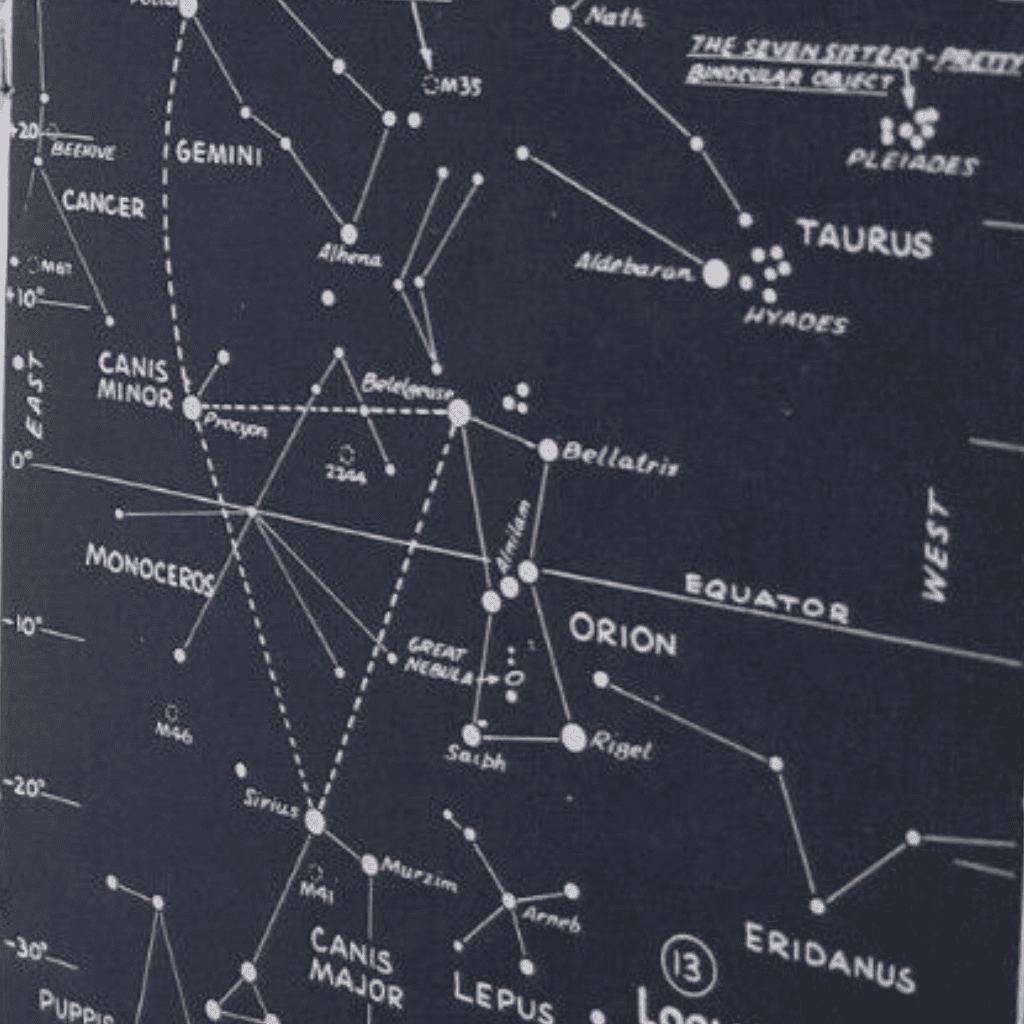
Go back to your star chart. If you’re facing the northern sky, then have the chart with the north at the bottom and south at the top. Reverse it if you are facing south.
Spin the chart wheel to the date, so for instance, this article was written on November 17, so we would spin to that date. Reference figure 11 in the images above – you want to take the meridian chart from page 5 and place the top of the meridian chart edge to the opening in the middle of your star chart. Align it to the top of the arc.
For instance, we’re close to 40° latitude, and facing south – which means we’re just missing Perseus. The 40°zenith on November 17 is part of the Pleiadies, followed by Taurus, and further down we should be able to see part of Erinadus. Really cool, right? Since time is a constant of change, and the planet keeps spinning, every day can bring a new adventure to your hobby. If you love it, and we think you will, there are some baby steps you can take before you pull out a credit card and charge for some expensive lenses. Here are some of those ideas.

ENHANCING YOUR ASTRONOMY PRACTICE
Want to expand your stargazing adventure into something even more mind-blowing. We’ve got the roadmap right here with a few magic phrases: ‘Kids Activities,’ ‘Upgrade Gear,’ and ‘Keep Learning.’ Here’s what we mean:
Kids Activities:
Why not turn it into a stargazing family night? You can still use the telescope you made in this tutorial, so no need to fork out a fortune on high-end telescopes or anything. It’s just you, your excited kiddos, and the night sky putting on a show.
If you want to take the equipment up another notch, still without spending year’s salary, try making a DIY constellation projector. It’s a great astronomy project when the weather is a bit too cold to take the exploration outdoors. Similarly, you could try making a sundial together with a DIY sundial kit from Etsy. It’s a great lesson in ancient history but also a cool way to see the impact the solar system has on our daily lives.
Now, this last idea may not be the most DIY activity, but it’s certainly the most delicious on our list. If you’re going to cruise the skies for stars, you’ll need to bring some snacks along. Grab some Oreo cookies and use them to explain the phases of the moon. It’s educational, and tasty, and it’s got Oreos. Need we say more?
Upgrade Gear:
If you and your family have caught the astronomy bug and are looking to take your stargazing game to the next level before investing in an expensive telescope, you could go in a couple of directions. The most obvious choice is upgrading your telescope to a version that can take your vision much further. We recommend going with the Gskyer 70mm Aperture Telescope from Amazon – between the price being extremely reasonable (sometimes you’ll find it for less than $100) and it’s one of the most highly rated (4.3/5 stars) and purchased telescopes (over 26,000 reviews) on Amazon, this is a hard one to pass by. There are many variations of magnifications and apertures for the Gskyer series, but this one is a great entryway into a more serious telescope.
A second idea that everyone seems to forget about is binoculars. Yeah, you heard right. These aren’t just for bird-watchers and nosy neighbors; they’re a stargazing superstar. With a decent pair of binoculars, you can spot the craters on the moon. We recommend going with a 70mm aperture pair of binoculars or greater for stargazing.
Keep Learning
For budding astronomers, there’s never been a better time to be alive. There’s a myriad of online resources and apps just a few thumb taps away. Apps like Stellarium, SkySafari, and Star Walk 2, can act as your personal guide to the universe. On the iPhone, our favorite app is hands down SkyView. We also hear great things about Sky Map on Androids though.
These tools help you identify constellations, stars, and planets with precision. So, whether you’re snuggled in your backyard or out camping, you can turn your gaze upwards and let these apps help you navigate the sky. Trust us, it’s a game-changer!
OLD-FASHIONED BOOKS
We use the term ‘old-fashioned’ lightly here, because we’re still bigger fans of tactile books than ebooks. But there are so many amazing astronomy guides in whatever form you decide to grab them in – digital, print, or a copy of both!
If either medium is your speed, think about titles like “Turn Left at Orion” or the magazine Sky & Telescope’s “Pocket Sky Atlas”. They’re crammed full of fascinating stories, captivating images, and all sorts of useful tidbits about locating areas of the universe.
GET SOCIAL
Last but not least, why not make your star-gazing adventures a social event? Join a local astronomy club or society, or better yet, create one with other parents in the neighborhood, where all the kids can join together and appreciate astronomy at the same time.
Trust us, there’s nothing quite like sharing your discoveries and enthusiasm with fellow stargazers. Plus, you might pick up a trick or two from more experienced members.

THE SKY IS THE LIMIT
If you’re tired of the family sitting on the couch gazing at the TV, take action and turn your gaze to the skies – hobby astronomy is a stellar way to bond with your loved ones, plus it’s educational. If you can remember the joy you felt as a kid when you discovered something new, the thrill of uncovering a secret or finally solving a puzzle – that’s the same feeling your kids will experience with backyard astronomy. The best part of astronomy as a hobby is sharing what you know. So grab the fam and get out into the country. Get away from the light pollution. Disconnect from technology (unless it’s your stargazing companion app) and spend some time out in nature.
If you like this hobby and want more ideas directly in your inbox, don’t forget to subscribe to our newsletter.
We’ll keep you in the loop with our latest articles and updates. Not just that, you’ll also be the first to know about new hobbies we introduce.
Happy Hobbying