
Few people know the ins and outs of scrimshaw these days but believe it or not, scrimshaw was wildly popular toward the latter half of the 19th century. Scrimshaw is the ancient art of carving designs and patterns on ivory that some craftspeople continue to this day. Scrimshaw requires immense skill, but also a wide variety of tools. So then what tools does one need to scrimshaw?
The tools used to scrimshaw include a scriber with multiple blades and point widths, some form of magnification, a vice grip, wax pencils, and a good light source like a hobby light. At a bare minimum, someone new to scrimshaw would need at least a scriber, but tools vary with experience and budget.
If you’re interested in learning scrimshaw, you’ll first need to find the right tools. While in the past this may have just included a pocketknife or sailmaker’s needle, modern times call for more modern tools that make it far easier to learn. In this article, we’ll show you exactly which scrimshaw tools are essential for anyone getting started with this unique hobby, and where to get them.

THINGS TO NOTE BEFORE PURCHASING SCRIMSHAW TOOLS
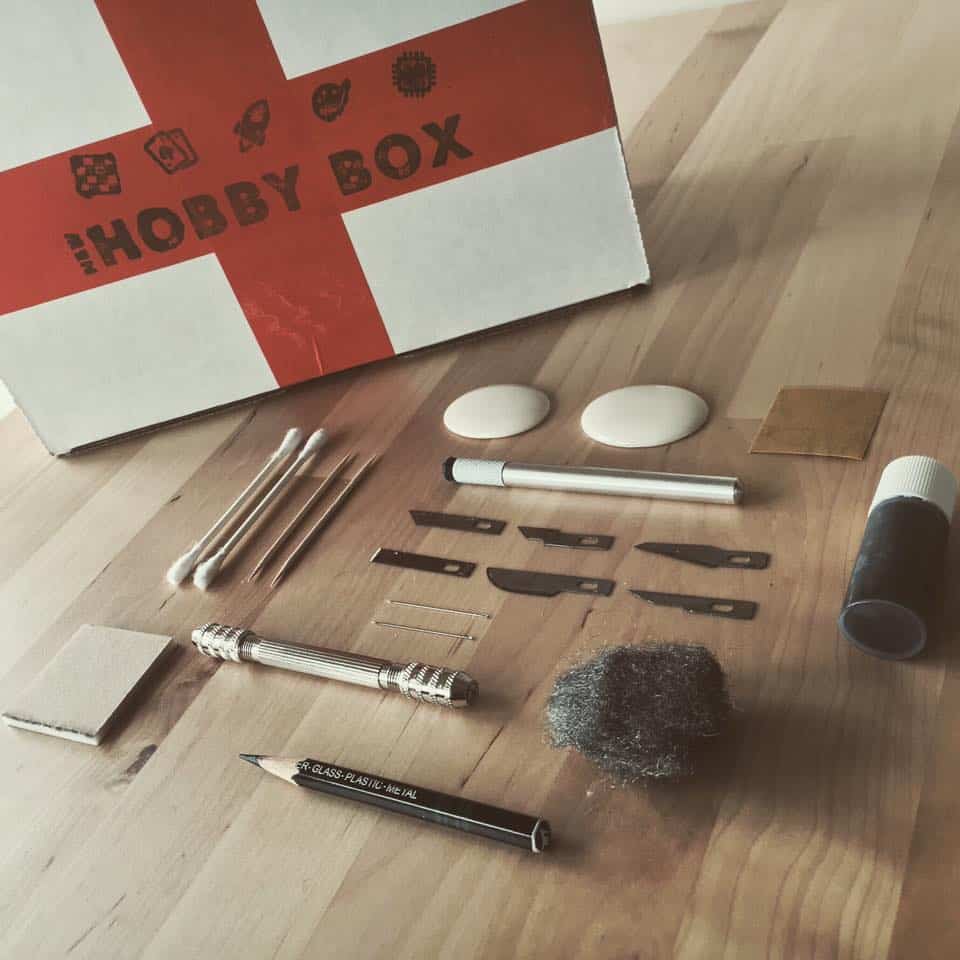
New Hobby Box launched its scrimshaw tutorial and kit for beginners in 2018 – it was wildly popular. But behind closed doors, the team was scrambling to find the right scrimshaw tools for someone new to the hobby. It was chaotic, to say the least.
Thankfully, there are far more scrimshaw tools available today for beginners, so this is the perfect time to call out what you need and where to get it.
There are a couple of things you should know before clicking “Add to Cart” though:
If you aren’t all that familiar with what scrimshaw is or how to scrimshaw, you’ll want to have a look at the New Hobby Box scrimshaw tutorial. It will give you a solid idea of what the art entails and how tools can be used, which is a great setup for the second thing you should know.
The type of engraving tools needed to scrimshaw depends on the scrimshaw techniques you plan on using. In the New Hobby Box scrimshaw tutorial, scroll down and look at two of the techniques – stipple, and scratch.
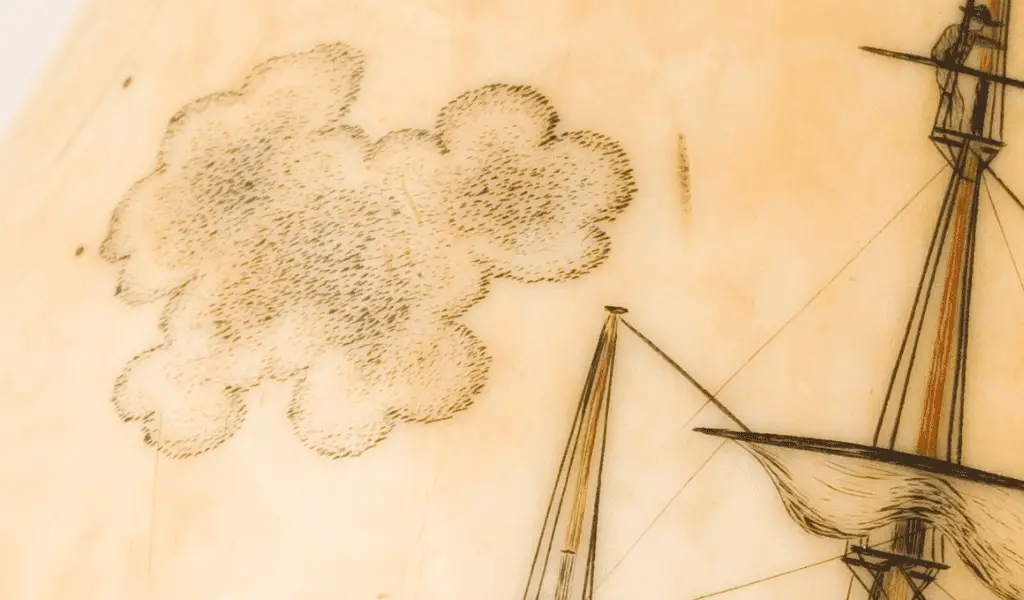
Scrimshaw Stipple Technique:
A typical scribe is only going to be good for the stipple technique, in which you just make a ton of tiny little holes in the ivory. For this, you’ll need a scriber with multiple blades and point widths, as well as a good light source. A vice grip is also helpful if you plan on doing the stipple technique for longer periods.
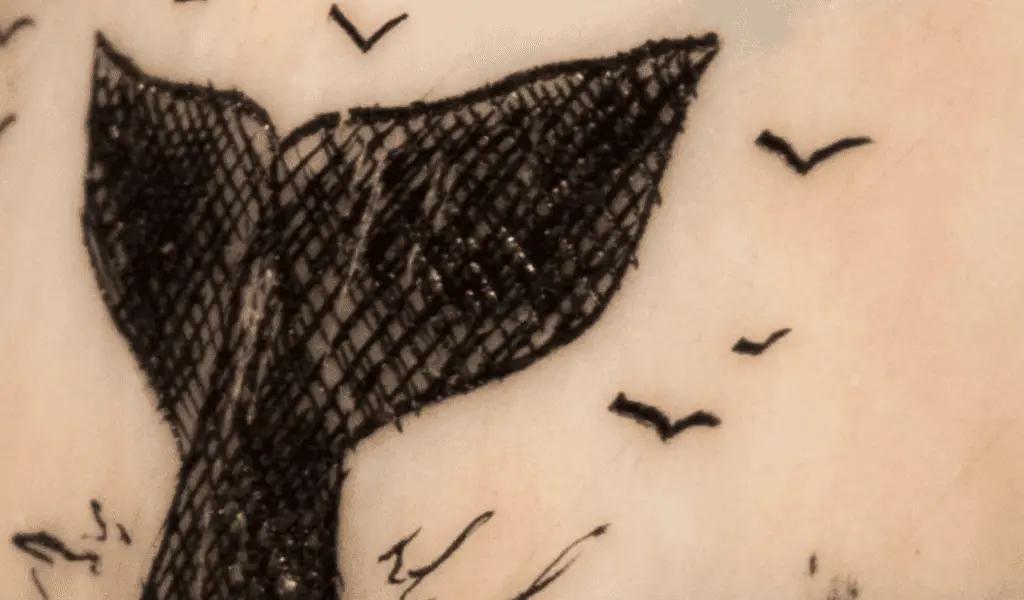
Scrimshaw Scratch Technique:
If you want to use the scratch technique (which is more akin to carving as if you are making small cuts in the ivory) you are going to need to use something closer to an X-ACTO blade. Numerous other lesser-known tools can produce various other effects on faux-ivory using a myriad of different (and often advanced) techniques.
If you aren’t sure which technique you want to roll with, that’s completely fine. At the end of this article, we’ll show you a couple of recommended kits that include all tools you would need to do both techniques.
SCRIMSHAW TOOLS: WHAT YOU NEED AND WHERE TO BUY THEM
Now that you have a general idea of the two techniques and the tools needed to do them, let’s talk specifics. Take note that everything in this section is sharp and can cause harm, so be smart about using these tools and purchasing them. They can be part of a great gift, but certainly not for children.
Here are some of the most popular scrimshaw tools available for purchase, as well as where to get them.
Blades, Scribers, Chisels, & More
BLADE/KNIFE: X-ACTO BLADE & KLEIN HAWKBILL
The simplest and most inexpensive tool for scrimshaw is an X-ACTO blade, which is a lot easier and safer to use than a pocket knife. An X-ACTO blade will work well for those looking to get started using the scratch technique.
Outside of technique, X-ACTO blades are great because you can use them for a ton of other hobbies – in fact, you may already own one. So if you start scrimshaw and find out that it’s not for you, you can use it elsewhere. Plus, they are certainly the most affordable tool to get the scrimshaw job done.
For straight lines, you could also get a hawkbill knife. Aside from the coolest name out there, the hawkbill knife has a uniquely shaped edge that is excellent for carving straight lines on faux-ivory or any surface you scrimshaw on.
PIN VISE: STARRETT PIN VISE
A pin vise is going to be the next step up from your typical box cutter or X-ACTO blade. It will give you the means to hold a variety of different pin sizes, allowing you to make etches of varying sizes and styles.
A pin vise makes it easier to make very precise etches because of its size, as the pins/needles that it holds are even smaller and lighter than an X-ACTO blade. There are so many options out there for pin vises, but Starrett is a level above the rest.
It feels sturdy in your hands but it’s also easier to hold than other pin vises because of its smaller body circumference. And most importantly, your pins will not come out of their hold. That might seem like a small detail, but when you put a blade on a vise, if the clamp comes loose, it can be extremely dangerous.
That’s why it’s important to get a solid pin vise – it will improve safety as well as artistic detail.
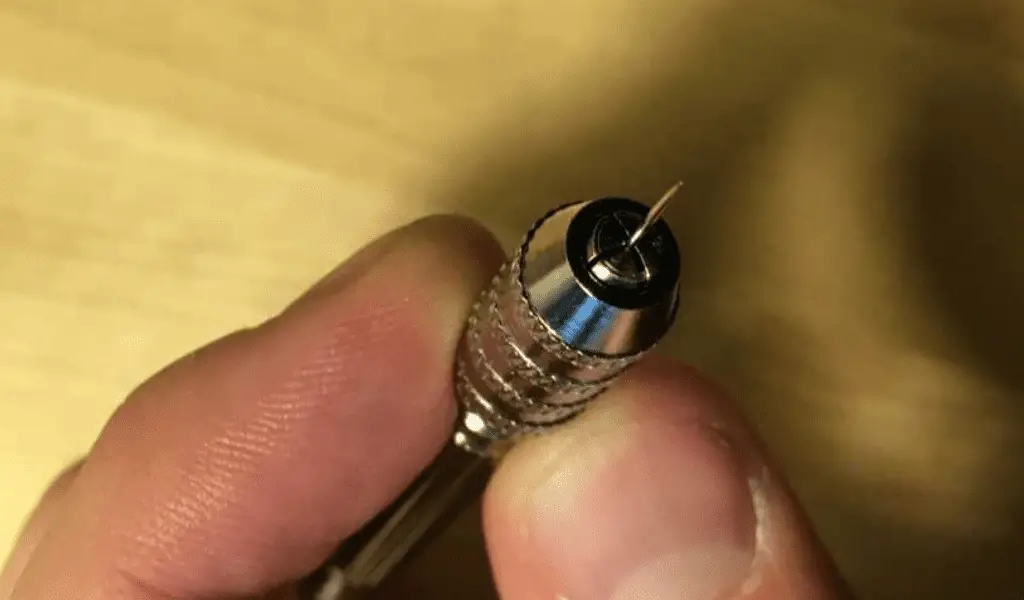
SCRIBER : STARRETT CARBIDE POCKET SCRIBER
Yes, Starrett is mentioned twice as a recommended brand, but that’s because their products are made extremely well, and they’ll get the job done correctly.
Scrimshaw scribe tools are purpose-built for this type of hobby. They come in a variety of sizes, so make sure to get one that is the right size for the type of scrimshaw you are making, err on the side of small if you aren’t sure.
The Starrett carbide pocket scriber linked is a great head size for any type of scrimshaw needs. This specific model is preferred because of the shape of the head – it has six faces. As you begin to scrimshaw, you’re faux ivory or whatever organic shape you work on, will have bumps and valleys. That type of working surface makes it extremely difficult to guide any tool where you like. Using a hexagonal head like Starrett’s pocket scriber prevents rolling in those cases since any rotation will hit an edge as opposed to a smooth circular surface.
This is the exact opposite of a round point scribe, which is akin to the sail needles that sailors would have used historically to make scrimshaw. They have to consistently be kept sharp to be effective. A triangle-point scribe will etch in a slightly different manner than a round-point scribe and the hexagonal equivalent as well.
Many scribers can hold multiple sizes of needles, although some hand-made ones do not have interchangeable needles. So if you go with a different option, just get a sense of what head you’ll need. Over time, you may find that it is handy to have several different sizes of scribes on hand while you work.

CHISEL: MULWARK KIT
A straight chisel can come in various sizes, and it’s beneficial to have a few different ones on hand. These are used for walking/rocker engraving. The MulWark kit linked in this section has a few different styles of chisels – angled and two sizes of straight chisels.
Plus, it includes a couple of bare pin vises that you could insert needles into very easily.
It’s not the fanciest kit on the market by any means, but it’s sturdy and a great price for everything it includes.
Scrimshaw Materials – Faux Ivory
While scrimshaw was traditionally (or most commonly, at least) done on sperm whale teeth and walruses tusks, the art has expanded over time to include carvings done on virtually any kind of bone.
That’s not going to happen today, aside from being illegal, it’s entirely unethical.
But you’ll be content working on faux-ivory, I promise. It’s just as fun and without the guilt and atrocity caused to animals. One particularly good material for scrimshaw is melamine, which is often used in knife handles. Various other forms of white plastics are suitable for scrimshaw.
You can also use bones that you might find in the woods, or antlers, these are commonly used in place of ivory today.
Lighting – Neatfi XL Lamp
Considering that scrimshaw is commonly done on white faux ivory, it’s very difficult to see what you’re doing without proper lighting. A hobby lamp is the best option for most people, as it’s both easily adjustable and quite bright, although any sort of adjustable lamp that’s decently bright will likely work as well.
The Neatfi XL is a fantastic hobby lamp. Sure, it does the light source thing well, but it also has adjustable lighting settings – making it warmer or cooler. This is super helpful with stippling or etching. The temperature of the light makes it easier to create contrast between your markings and the rest of the material.
Also, your scrimshaw surface is going to be super small when you get going on detail work. You’ll want a source of magnification in that instance, the Neatfi XL has magnification in the middle of the lamp head, which is incredibly handy.
Wax Pencils, Ink, and Polishing Tools
Black India ink is the most common and traditional form of ink widely available for scrimshaw. However, some people experiment with colored ink on scrimshaw. In addition to ink, you’ll need cotton swabs to apply the ink.
Wax pencils are also helpful – this is what we use 95% of the time because they are far simpler and we like to freehand many of our designs instead of trace. You can trace with paper and acetone, but it’s a lot of extra work unless you’re trying to create an identical copy of something.
To polish your scrimshaw and remove initial mistakes, you’ll want either steel wool, sandpaper, or a Dremel tool to polish your ivory.
Beeswax is a particularly good substance for polishing and will leave your ivory looking quite shiny.
RECOMMENDED SCRIMSHAW KITS:
With so many options for a scrimshaw kit, you could easily be overwhelmed. Don’t worry, we have your back! Here are our top picks to help make the decision easier – these should definitely not be overlooked – no buyer’s remorse here!
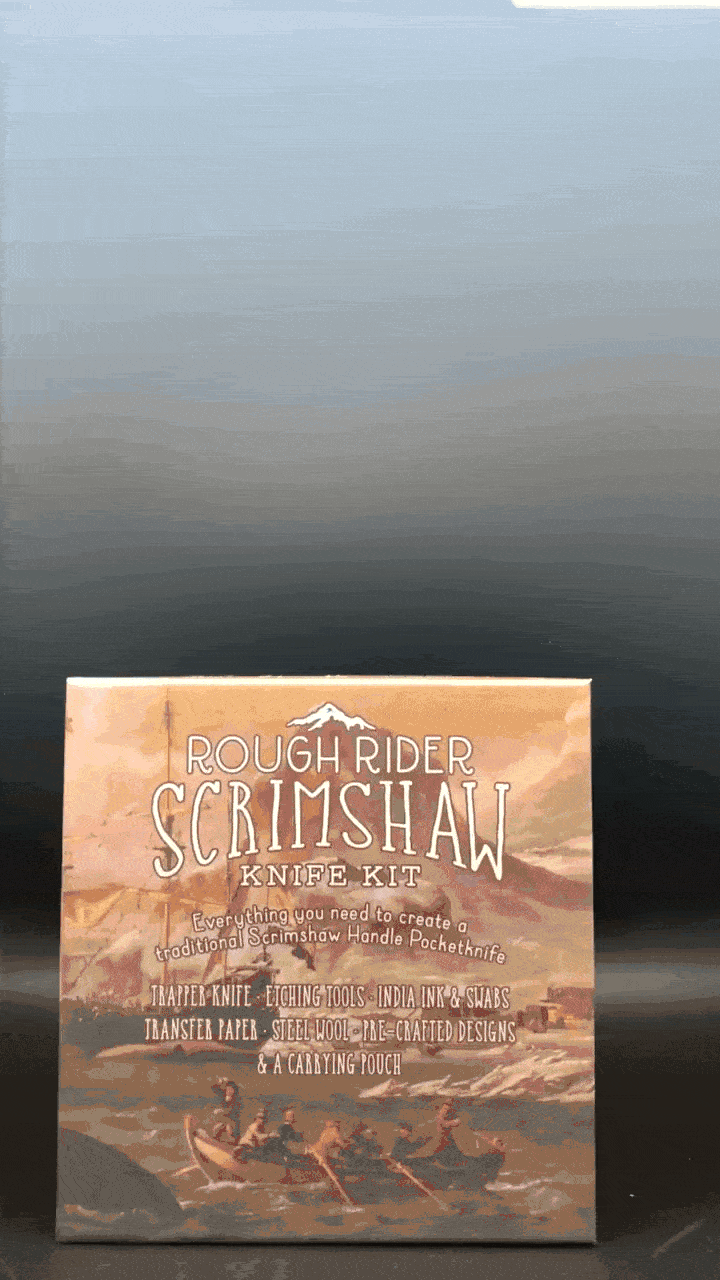
BEST-PRICED SCRIMSHAW KIT FOR BEGINNERS
Enter the world of custom scrimshaw with the Rough Rider Scrimshaw Kit! This awesome kit (gif above) comes complete with everything you need to create a scrimshaw masterpiece on a real knife: stencils, tools – even its own nifty carrying case.
This kit is the perfect present for any fan of knives or someone who loves learning precision skills and could appreciate the historical integrity of scrimshawing a knife The only downside of this kit is its limited toolset, but its directions and stencils are guaranteed to make up for that.
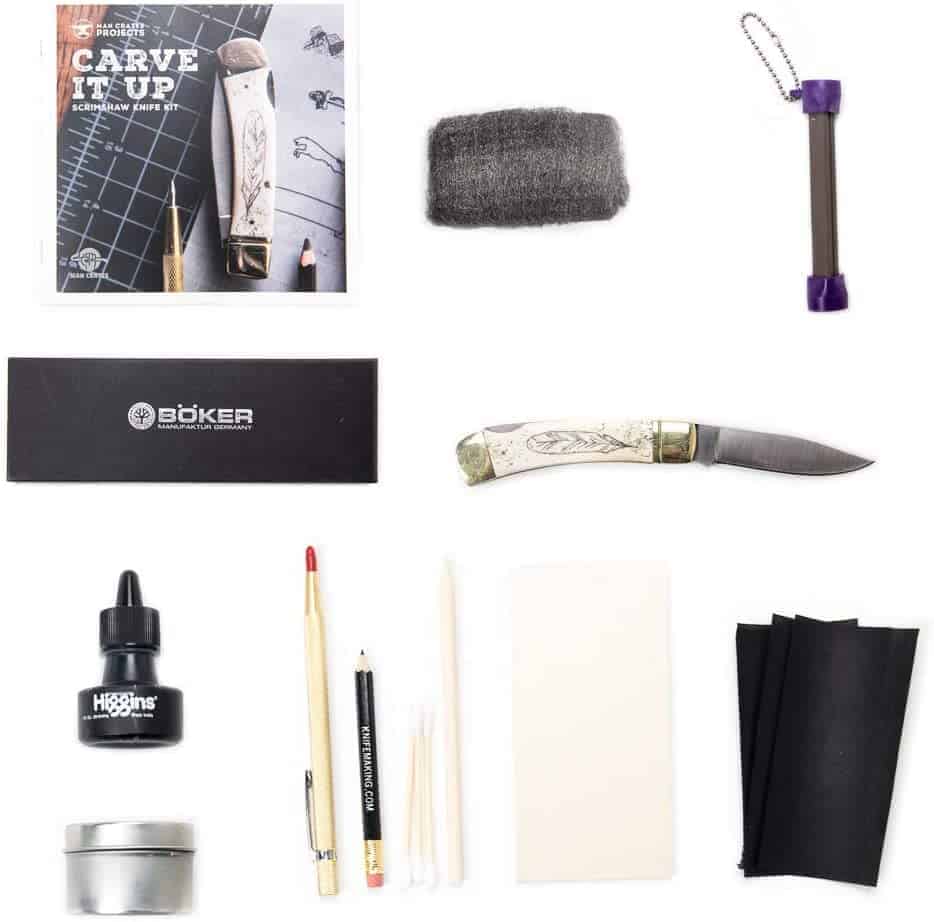
BEST-QUALITY SCRIMSHAW KIT FOR BEGINNERS
Man Crate is the go-to source for intriguing gifts and exciting surprises. So of course they went all out in the scrimshaw department and created a high-quality scrimshaw knife kit. It has everything you need to get started on your own masterpiece, from an array of tools to black India ink.
This comprehensive kit hits the wallet a little harder than the first kit. It’s not so much that it offers more tools and materials than the Rough Rider kit, more so the presentation and the quality of products are more elevated.
Personally, Man Crate’s Scrimshaw Kit is a “wow” gift, but that comes with a price.
START SMALL WITH SCRIMSHAW TOOLS
While there are numerous tools you can use to create scrimshaw, you can start out quite cheaply with just one or a few tools.
The New Hobby Box scrimshaw tutorial has a few lower-priced alternatives to the tools above that you may want to check out if you’re on the fence about scrimshaw.
Sure, there are some shared ones, after all, we aren’t going to recommend something we don’t believe in.
So the kits are the same in both articles, and some of the tools, but we also tried to be scrappier with some bare-bones options for everyone to get into scrimshaw.
Scrimshaw is a fine art, but it’s also something that requires you to learn as you go and get comfortable with the tools of the trade over time!
If you’re looking for something that’s a bit more on the making side and less on the etching side, the New Hobby Box “How to Make Paper by Hand” tutorial might just be the answer. Regardless of whatever hobby you take on, we hope you find fulfillment in it and discover something you’re truly passionate about.